Wednesday, June 27, 2012

The Golden Rules of SPF

I LOVE being out in the sun and having that summer glow!  But, I must admit, I'm not always the best at applying sunscreen, so I thought I would share a few helpful tips I recently came across...


SPF, what???
Terminology on sunscreen labels can be so confusing.  SPF actually isn’t an ingredient in sunblock or sunscreen, it stands for Sun Protection Factor and is a number that indicates how well a product blocks UVB rays.

SPF 15 was once the standard dermatologist recommendation for daily sunscreen, but now many doctors say SPF 30 is the new 15.  Although no sunscreen shields you from 100% of UV light, SPF 30 offers 96.5%  protection versus SPF 15's 93.5% -- and more protection (even just 3 percent) is always better for glowing skin!

Sunscreen up!
  • 365 days a year.  UVB rays (they burn you) peak in June, but UVA rays (they age you) stay constant year-round.
  • Rain or shine. 40% of UV rays penetrate skin on cloudy days.
  • At least every 90 minutes when outdoors; immediately after a swim.
  • 30 minutes before going outside, to allow ingredients to activate.
  • Wear SPF 30 with broad-spectrum UVA/ UVB protection - apply to your face, neck and hands every single day and smother it onto your body when you are going to be outdoors in the sun.


Pin It


Friday, June 22, 2012

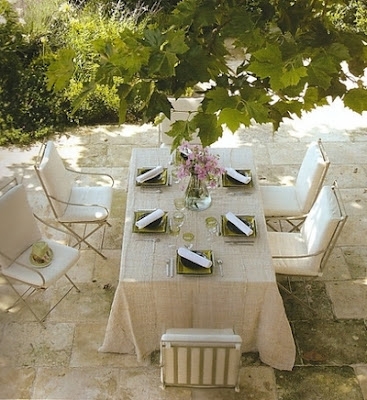
Dining Al Fresco

Good Morning!

Summer is officially here, woohoo!  Perfect time for all of the fun outdoor dinner parties, and evening drinks while enjoying the cool summer breeze.   Here are a few of my favorite backyard settings...


Pin It

Tuesday, June 12, 2012

Banana Cake With Nutella Frosting

Yes, you read that right, NUTELLA frosting, life doesn't get better than this!  I try to keep my intake of nutella to a minimum (sometimes this is a challenge)  but when I found this recipe I knew I had to make it instantly!  Thankfully, my husband is super supportive of all my cooking adventures and encourages all baking, what guy wouldn't right?!  Let me explain to you that my love for nutella goes back to when my friend Monica introduced it to me during our traveling days in Paris...I'm pretty sure I indulged in at least four two crepes a day, of course filled with nutella and fresh bananas.  This cake is super moist and the perfect mix of nutella goodness and banana flavor.  Enjoy!


Banana Cake With Nutella Frosting
adapted from:  The Ginger Snap Girl

Ingredients for the cake:
2 1/2 cups all purpose flour
1 teaspoon baking soda
1 1/2 teaspoons baking powder
1 teaspoon salt
1 1/4 sticks (10 tablespoons) unsalted butter, room temperature
1 1/2 cups superfine sugar
1 1/2 cups mashed ripe banana (about 3 large bananas)
2 large eggs
1/2 cup buttermilk
1 1/2 teaspoon vanilla extract

Directions:
Preheat oven to 350 degrees F.  Line 9 x 13 cake pan with parchment paper.  Or alternatively you can butter and flour the pan, knocking off excess flour. 

In a medium bowl, whisk together flour, baking soda, baking powder and salt and set aside.  Cream butter and sugar in a stand mixer on medium speed for about 2 minutes until light and fluffy.  Add eggs, one at a time and beat on low until just combined.  Add in vanilla and mashed bananas and mix until just combined.  With mixer on low add 1/3 of the flour mixture and beat until just combined.  Add half the buttermilk.  Alternate flour and buttermilk, starting and ending with buttermilk.  Do not over mix.  

Pour batter into prepared pan and bake on center rack for 35 minutes or until a toothpick inserted in the cake comes out clean.  Cool for 10 minutes in the pan and then turn cake out onto a cooling rack and remove parchment.  Allow cake to cool completely before frosting.

Ingredients for the frosting:
3/4 stick (6 tablespoons) unsalted butter, room temperature
3/4 cup Nutella
2 1/2 - 3 cups confectioners (powdered) sugar, sifted
2-4 tablespoons heavy cream (or condensed milk)

Directions:
In a stand mixer beat butter and Nutella on medium, about 1 minute until fully combined.  Add in confectioners sugar 1 cup at a time.  Mixture will appear crumbly.  

Add in 2 tablespoons of cream and continue beating on medium-high speed for about 3 minutes.  Add additional tablespoons of cream until the frosting reaches a soft, spreadable consistency.  I used 4 tablespoons in total.  

Generously spread frosting over cooled cake.  For a smooth finish, run your knife or offset spatula under hot water and gently smooth the surface, rinsing off it off after each swipe.  


Pin It

Linking to:
504 Main

Tuesday, June 5, 2012

Photo a Day Challenge ~ June

Come join the fun, it's time for another month of photo a day challenge!  If you missed my post about this last month, you can catch up HERE.  Excited to see what photos you capture for June!  Cheers!

You can follow me here:  
Instagram (@lapetitevie)  ~  Facebook  ~  Pinterest  ~  Twitter (@lapetitevieblog)

Thursday, May 31, 2012

Asparagus Tart

I am totally loving this asparagus tart, think I have made it at least a dozen times in the past 2 months!  It can easily be assembled ahead of time making it perfect for brunch or an appetizer. The asparagus is tender and tastes so delicious with the melted cheese and crispy croissant.  Enjoy!


Asparagus Tart
adapted from: Fat Girl trapped in a Skinny Body

Ingredients:
1 sheet puff pastry or refrigerated crescent rolls 
1 package (5 ounces) Boursin Cheese - garlic & herb (I have also used goat cheese, tastes great too)
1 clove garlic, minced
1 bunch of asparagus, ends trimmed
salt and pepper
olive oil


Directions:
Preheat the oven to 400 degrees.  Line a baking sheet with a silpat mat or parchment paper. 

Lay the pastry on the mat and use a rolling pin to thin it out a bit. Shape into a large rectangle, almost 11×15 inches. Trim the edges with a pizza cutter or a knife, only if you want perfectly flat edges.

Using a large spoon, rubber spatula, or any tool you want, spread the cheese on the pastry (you can also just crumble the cheese on).

Sprinkle with the minced garlic. Lay the trimmed asparagus on the cheese, alternating tip to end.

Drizzle with olive oil, sprinkle with salt and pepper if needed.

Bake for 15 minutes, or until the tart edges are evenly browned and the asparagus is starting to ‘wrinkle.’

Remove form the oven, and cut into squares. Use a large knife and cut gently so the warm cheese doesn’t ooze out.

Serve warm or at room temperature. Store leftovers in an airtight container in the fridge.


Pin It


Tuesday, May 22, 2012

Caine's Arcade

Good Morning!

When I came across this short film, I was completely in awe by this amazing 9-year old boy and his remarkable story.  Take a few minutes to meet Caine...he will surely brighten up your day, bring a smile to your face and if you are anything like me,  a few tears of joy...


Tuesday, May 15, 2012

Caramel Stuffed Sugar Cookies

I pretty much love anything with caramel, so I couldn't wait to make these perfectly soft and chewy cookies!   These cookies are full all kinds of gooey and sugar goodness.  Enjoy!


Caramel Stuffed Sugar Cookies
adapted from:   My Kitchen Addiction
Makes: 3 dozen

Ingredients:
3/4 cup (1 1/2 sticks) unsalted butter, softened
3/4 cup granulated sugar
1/2 cup packed dark brown sugar
1/4 cup light corn syrup
2 teaspoons vanilla extract
1 1/2 teaspoons baking powder
1/2 teaspoon baking soda
1/2 teaspoon salt
1 egg
2 1/2 cups all purpose flour
1 box Milk Duds
1/2 cup coarse raw sugar

Directions:
Preheat the oven to 375°F.  Line a baking sheet with parchment paper or a silicon liner.

Combine the butter, granulated sugar, brown sugar, corn syrup, vanilla, baking powder, baking soda, and salt in a large mixing bowl. Beat on medium speed until all of the ingredients are evenly incorporated and the mixture is light and fluffy. Beat in the egg.

Gradually, add the flour to the creamed mixture, stirring just enough to incorporate the flour. Shape rounded tablespoons of dough into a ball, pressing a Milk Dud into the center of each ball. (Be sure to cover the Milk Dud completely with the sugar dough.)

Roll the ball in the raw sugar and place it on the prepared baking sheets.  Be sure to space the cookies 2 – 3 inches apart.

Bake the cookies for 10 – 11 minutes, until they are just golden on top. Let the cookies cool on the baking sheet for 5 minutes before transferring to a wire rack to cool completely.


Pin It


Linking to:
504 Main